Prime PlusUpdated 6 months ago
Shop Theragun Prime Plus
Powerful massage combined with heat for enhanced warm-up and recovery.
Key Product Features
- Powerful 16mm percussive massage therapy
- Heat therapy with 3 temperature levels
- 3 attachments: Dampener, Standard Ball, Wedge
- On-device controls and LED indicators that display massage speed and heat levels
- Choose from 5 speeds and 3 heat levels to adjust pressure and heat for targeted relief
- New, more compact triangle handle and textured grip - so you can comfortably treat anywhere on the body
- Drop and scratch-resistant design
- Compatible with Plus Attachments, including Vibration and Cold (sold separately).
What's included in box?
- Theragun Prime Plus device
- 4 massage attachments: Heated Percussive Plus, Dampener, Standard Ball and Wedge
- USB-C charging cable
- QuietForce Technology oil
- Travel pouch
What attachments are included?
The Theragun Prime Plus includes Heated Percussive Pluss Attachment plus 3 additional attachments
- Heat Therapy - Loosen up stiff muscles and accelerate recovery.
- Dampener - Reduce aches and pains in tender or sensitive areas.
- Wedge - For shoulder blades, IT bands, scraping and flushing.
- Standard Ball - Reduce tension with an all-over body massage.
Vibration Therapy and Cold Therapy attachments are also available to help reduce inflammation, pain and swelling. Both sold separately.
Turning on Your Device
1. Turn on the device. Slide your hand into the ergonomically designed Theragun triangle handle. Press and hold the power button to turn on the Theragun Prime Plus. The device’s LEDs will illuminate when the device is on.
2. Select a percussive treatment speed. Press the power button to toggle through the five treatment speed options. Each LED light will illuminate to indicate treatment speed intensity, with one white LED illuminated at the lowest speed and 5 LEDs illuminated at the fastest speed.
3. Use the device. Move the device across the areas in need of treatment, gradually applying light to moderate pressure as needed.
4. Use the heated percussive attachment. Attach the heat attachment, turn on the device, and select your desired speed as noted above. Press the intensity button to adjust the heat temperature. Each of the three LED lights will illuminate to indicate treatment temperature intensity, with one orange LED illuminated at low heat, two at medium heat, and three at high heat. To use heat without percussive therapy, continue to press the power button to toggle through the speed options. After the highest speed, percussive therapy will turn off.
5. Lock the device. When not in use or during transport, lock the device to prevent battery drainage or turning it on accidentally. Quickly press the power button three times to initiate the lock function. Quickly press the power button three times again to unlock.
6. Turn off the device. Press and hold the power button to turn off the device.
Adding Attachments
Ensure that the device is powered off before connecting or removing any attachments. Line up the white dot on the device with the white dot on the attachment. Insert the attachment into the device arm, twist and lock into place. To unlock and remove the attachment, twist in the reverse direction and pull it off.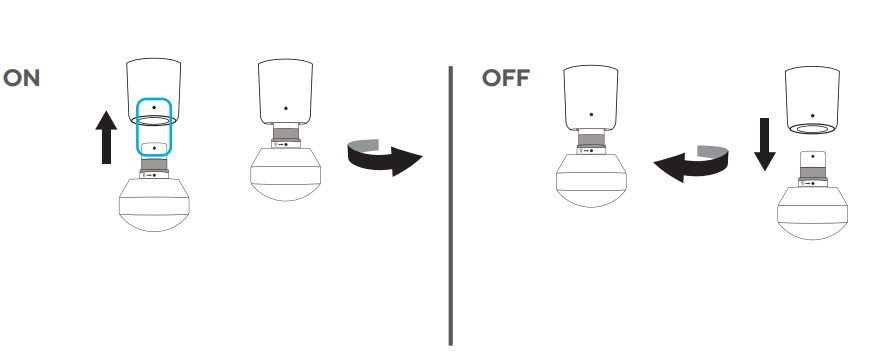
Heat Therapy
To add Heat Therapy to your routine, connect the Heat Therapy attachment to your device. Short press the right button to toggle to the heat indicator. Short process the up button to increase the heat temperature and short process the down button to decrease the heat temperature. There are three hot temperature settings.
Charging and LED Indicator Guide
Ensure that the device is powered off before charging, the device will not power on while charging.
- The device is USB-C enabled and comes with a charging cable.
- Connect one end of the charging cable to the USB-C charging port on the device. It is located on the handle of the device. Connect the other end of the charging cable to a power adapter.
- The power button has an LED light that will indicate the battery status when the device is on or charging. Turn on the device or press the power button to check the battery status.
- Orange (blinking, and then turns off): No battery
- Orange (blinking): Very low battery
- Orange: Low battery
- Blue: Half battery
- Green: High battery
Care and Cleaning
- The Theragun Prime Plus is NOT waterproof or machine washable. Do not allow any liquid or water to enter the device or charging port.
- Ensure that the device is powered off before cleaning.
- To clean, wipe the device surface with a disinfectant wipe to remove any residue.
- Once the device is residue-free, use a clean disinfectant wipe to thoroughly clean the device surface and attachments, wiping in a circular motion.
Specifications
| Battery Life |
|
| Weight |
|
Dimensions |
|
| Material |
|
User Manuals
Theragun Prime Plus User Manual